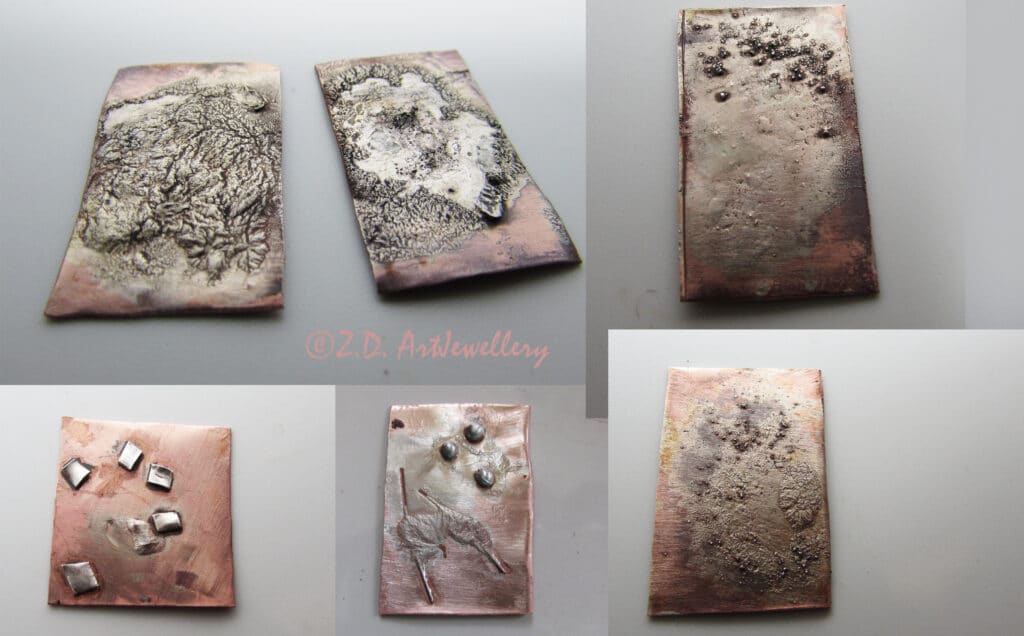

In this post, I want to write about texturing copper with silver and reticulated silver. I have tested various forms of silver to texture copper that I recorded as a short video. You can actually use various forms of your scrap silver to texture copper and using this method, reclaim them.
I am using reticulated silver, but not pre-prepared reticulation silver alloy which is usually about 80% silver and 20% copper! I reticulate silver on copper to become part of its texture or at least it is a process similar to reticulation. I also use silver dust collected from sawing. In addition, I try to fuse tiny pieces of silver, wires and granules on copper sheet.
Lets first have a look at what the reticulation is! It is a method to create particular texture on sterling silver, reticulation silver or other alloys like gold alloys. The texture usually consists of unique wrinkles and ripples. The method that is being used include depletion gilding and then heating.
What is depletion gilding in sterling silver? It is a series of annealing and pickling (to remove the oxides) sterling silver to bring fine silver to the surface of alloy. As you know, sterling silver has 92.5% silver and 7.5% copper. With annealing and cleaning the copper oxides and repeating this process, we increase fine silver percentage in the surface. So, the melting temperature of surface and core is different. Then, by heating the alloys with two different melting temperature, the core with lower melting temperature starts to melt in one point in which the surface with higher melting temperature is in solid state. So, melting the core will create wrinkles and interesting effects.
I used scrap silver for this method. I did not depletion gild silver pieces in the video. I actually melted them on the surface of the metal that created texture similar to reticulated silver. Maybe, I repeat the process in the future using depletion gilded silver and see how it will turn out. I also tried flux on a piece and I don’t think if it had a significant impact on the efficacy of melting. I am not sure if it can affect the texture as the created texture is partly random anyway! I think if you use a sharper flame, you will have more control over the texture you are creating.

I usually collect silver dust produced during sawing. Now is the time to melt the dust on copper and I like the effect it creates. Heat around the piece/soldering block for few seconds and then slowly move your torch flame directly on dust. Melt them as much as you can and then pickle the piece.
Silver dust can cover a large area and change the colour of copper to silver. Some grains that are not get melted completely will keep their shape and result in an interesting grainy texture. I have also seen interesting textures generated on sterling silver using silver dust.

I tried to fuse tiny pieces of silver on copper and not melting them. It can be used as a replacement of soldering or to generate a coarse texture on metal. According to my experience, it is better that the pieces you are fusing have similar size and thickness. Otherwise, they will not fuse at the same time. Also, if your target is to produce a rough texture by fusing many silver pieces on copperat the same time, you probably melt few and fuse some others. Try to not direct the heat on just one spot and heat consistently! Particularly, do not focus your flame directly of silver pieces if you can, to avoid melting.

I have tried to fuse thin wires and also granules on the same copper blank. The wires were melted and granules were fused and maintained their shape very well. I was expecting the different melting time for wires and granules. So, if you like melting wires, thinner wires will work better. For fusing, use thicker gauge. Silver granules are also good choice to fuse on copper to add some beautiful details.

After texturing, you need to pickle your metal to remove fire scale produced during heating. This can be followed with polishing and burnishing. Other good option is adding patina. I am thinking that adding blue-green copper patina can create a beautiful contrast between copper and silver texture. I haven’t tried it myself, but perhaps that is something I can try in the future! In this post, I have written about an easy way to add blue patina to copper.
Have a look on this article about reticulation process:
https://marketing.riogrande.com/acton/media/9764/feb-tech-tip
We use cookies to improve your experience on our site. By using our site, you consent to cookies.
Manage your cookie preferences below:
Essential cookies enable basic functions and are necessary for the proper function of the website.
These cookies are needed for adding comments on this website.
Stripe is a payment processing platform that enables businesses to accept online payments securely and efficiently.
Service URL: stripe.com (opens in a new window)
Statistics cookies collect information anonymously. This information helps us understand how visitors use our website.
Google Analytics is a powerful tool that tracks and analyzes website traffic for informed marketing decisions.
Service URL: policies.google.com (opens in a new window)
You can find more information in our Privacy Policy.